Accessing databases on Rahti from CSC supercomputers
Infos
This tutorial can also be applied if you are running websocat locally or in a cPouta instance for other purposes.
Many HPC workflows require a database. Running these on the login node poses several issues and running on Pouta brings administration overhead. Rahti is a good candidate, but one obstacle is that Rahti does not support non-HTTP traffic from external sources.
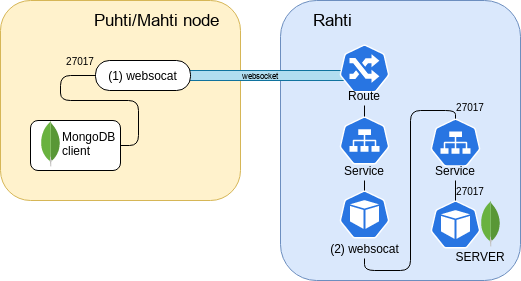
A workaround for this problem is to establish a TCP tunnel over an HTTP-compatible WebSocket connection. This can be achieved using a command-line client for connecting to and serving WebSockets called WebSocat. Here, a WebSocat instance running on Puhti/Mahti translates a database request coming from a workflow to an HTTP-compatible WebSocket protocol. Once the traffic enters Rahti we use another WebSocat instance running inside Rahti to translate back the WebSocket connection to a TCP connection over the original port the database is configured to receive traffic. A drawing of the process is shown below.
This tutorial outlines the steps to achieve this using MongoDB as an example database.
Note
The OpenShift template used below to configure WebSocat on Rahti is an unsupported beta version!
Note
This solution is suitable for computationally light use cases. Reasonable scaling can be expected for up to ~100 processes simultaneously accessing a database on Rahti. Exceeding this limit is not advised and may result in performance degradation.
Step 1: Setting up MongoDB and WebSocat on Rahti
Configuring MongoDB and WebSocat on Rahti can be done either through the web interface or using the oc command line tool. Notice that your CSC project must have access to the Rahti service. See here how to add service access for a project.
Note
Mind the difference between persistent and ephemeral storage when creating a new database in Rahti. Ephemeral databases are meant for temporary storage and should not be considered reliable. If the Pod in which your database is running is deleted or restarted you will lose all your data! To avoid this, create a database with a persistent volume and make sure to also perform regular backups to for example Allas.
Option 1: Using the Rahti web interface
- Log in to the Rahti web interface. See Getting access for instructions
- Select MongoDB from the front page catalog
- Configure the database. You need to at least select or create a Rahti project to which you want to add the database. If creating a new project, make sure to include your CSC project number in the project description in the form
csc_project: 2001234 - Create the database and remember the
- Username
- Password
- Database name (
sampledbby default) - Database service name (
mongodbby default)
- Select the created project, navigate to
Applications > Servicesand select the created database service. Remember the- Target port (27017 by default)
- Hostname address (of the form
<service name>.<project name>.svc)
- An OpenShift template is needed to configure WebSocat on Rahti. Download or copy this YAML file to your clipboard. Note that this is an unsupported beta template
- On the Rahti web interface front page, select Import YAML/JSON and add the WebSocat template to the same project as the MongoDB (upload by dragging & dropping, selecting it, or pasting from the clipboard). Do not edit the template!
- Select Create, process the template and input the above hostname and target port in the requested database service name and database port fields
- Select the created project, navigate to
Applications > Servicesand select the WebSocat service. Remember the route hostname (of the formwebsocat-<project_name>.rahtiapp.fi)
Option 2: Using the oc command line tool
- See Command line tool usage for basic instructions
- Login using your CSC username and password
oc login https://rahti.csc.fi:8443 -u <username> -p <password>
- Create a new project (namespace) or switch to existing one. If creating a new project, make sure to include your CSC project number in the project description in the form
csc_project: 2001234
oc new-project <project name> --display-name='My new project' --description='csc_project: <project number>'
# or
oc project <project name>
- Add MongoDB by launching the
mongodb-persistenttemplate. Remember the username, password, database name and the database service name. Use the-pflag to modify default parameters
oc new-app --template=mongodb-persistent
- Add WebSocat by launching the OpenShift template. You can check the target port with
oc describe services <service name>. The default parameters for the service name and target port aremongodband 27017, respectively
oc new-app --file=/path/to/websocat-template.yaml --param=DATABASE_SERVICE=<service name>.<project name>.svc --param=DATABASE_PORT=<port>
- Remember the route hostname of the form
websocat-<project name>.rahtiapp.fi. You can check this later withoc get route websocat
Step 2: Running WebSocat on CSC supercomputers
MongoDB and WebSocat have now been set up on Rahti and you should have the following details: MongoDB username, password, database name and the WebSocat route hostname. These are needed when connecting to the database. However, first we need to run the websocat binary on Puhti/Mahti to open the required TCP tunnel.
- Download
websocatfrom GitHub and add it to yourPATH. For example:
wget -O websocat https://github.com/vi/websocat/releases/download/v1.11.0/websocat.x86_64-unknown-linux-musl
export PATH=$PATH:$PWD
- We do not want to run WebSocat on the login node, so open an interactive session with
sinteractive -iand launchwebsocat. By passing 0 as the target port, WebSocat gets handed an available port which we can extract usinglsof(the below commands are conveniently put into a script). Recall that the<project name>placeholder in the route hostname provided towebsocatrefers to the name of your Rahti project
websocat -b tcp-l:127.0.0.1:0 wss://websocat-<project name>.rahtiapp.fi -E &
ws_pid=$!  # $! contains the process ID of the most recently executed background command
mkdir -p /tmp/$USER
lsof -Pa -p $ws_pid -i -sTCP:LISTEN | grep -v ^COMMAND | sed -e 's#.*TCP\s*\S*:\([0-9]*\).*#\1#' > /tmp/$USER/${SLURM_JOB_ID}_rahtidb_port
echo "Got target port $(cat /tmp/$USER/${SLURM_JOB_ID}_rahtidb_port)"
Note
If you want to access your database within a batch job, run websocat within your batch script. You can utilize the same obtained target port if you're submitting your job from an interactive session in which websocat is already running, websocat -b tcp-l:127.0.0.1:<port> wss://websocat-<project name>.rahtiapp.fi -E &. Otherwise, pass 0 as the target port and check which one it gets handed using lsof.
- Now
websocatis running in the interactive session/batch job and you may connect to your MongoDB database on Rahti using the obtained target port. You can verify the connection with e.g. Python. Note that the username and password below refer to the created database service, not your CSC credentials
Info
PyMongo version 3.13.0 must be installed otherwise the driver is too new for the MongoDB server. (More information: https://pymongo.readthedocs.io/en/stable/common-issues.html#server-reports-wire-version-x-pymongo-requires-y)
# module load python-data

from pymongo import MongoClient
from pymongo.errors import ConnectionFailure

client = MongoClient('localhost', port=<port>, password='<password>', username='<username>', authSource='<database name>')
try:
    print(client.admin.command('ping'))
except ConnectionFailure:
    print('Server not available')