Submitting secondary use health and social data for research use via SD Apply
These instructions are for data controllers who have issued a data permit for a research project and need to make their data available on SD Desktop.
Note
Before any data can be made available for researchers in the Sensitive Data services, you need to confirm that the necessary legal agreements are in place between the data controller and CSC. The first register data set must always be submitted in collaboration with the CSC Sensitive Data (SD) services team. You can start a conversation with the SD services team by sending a message to the CSC Service Desk (subject: Sensitive Data).
After the process is established for the first time, the representative of the data controller can manage the following data submissions on their own. Help is always available via the service desk. Below are the instructions for the data submission and access control.
Data submission
Note
Data controller and the persons responsible for the data transfer need to create CSC accounts by logging in with Haka or Virtu credentials at the MyCSC portal. If you don't have Haka or Virtu credentials, you need to request an account from CSC Service Desk (subject: Sensitive Data).
Step 1: Organizational profile in SD Apply
A representative of the data controller has to make the data available for the research group in SD Apply service.
After you have created an CSC account, you can log in to SD Apply service.
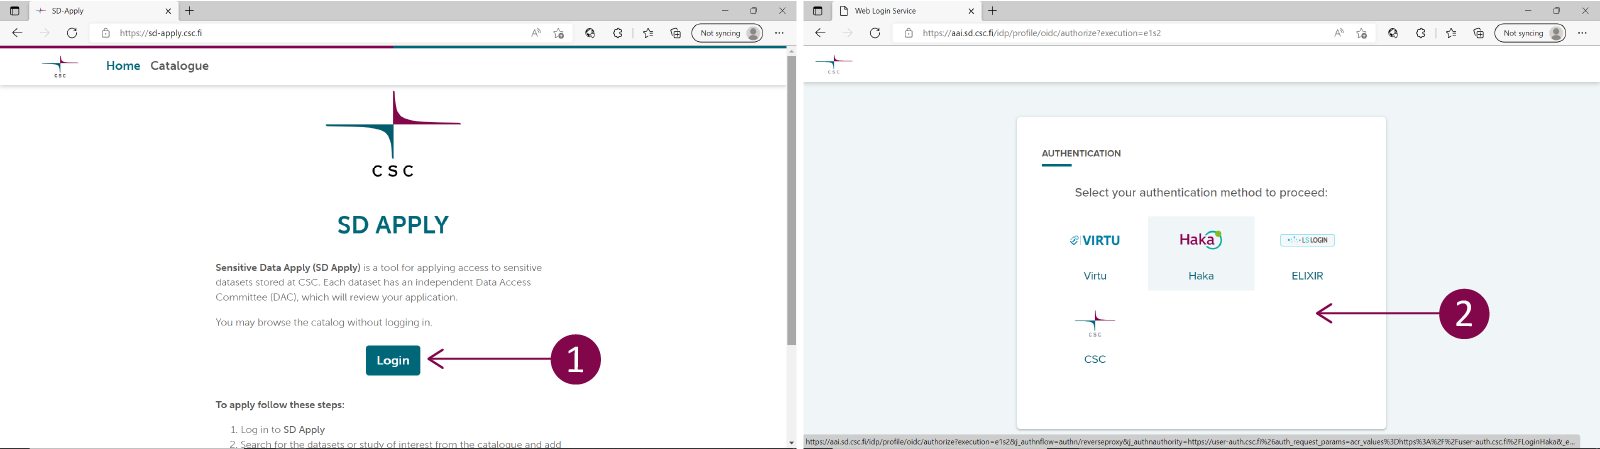
Note
Always use the same identity provider when you log in to SD Apply because all your actions are connected to your login identity (i.e. use always only Haka/Virtu login or the CSC login).
After the first log in, CSC service desk can create an organizational profile for the data controller, which will be used for all the data submissions coming from this organization, and assign you as an owner of the organizational profile. There can also be multiple owners for one organization.
Step 2: Creating objects in SD Apply
After you have been set as the owner of the organization profile, you can create a workflow, form and license for the organization in SD Apply.
- To the form, you add all the information needed for access applications. This information will be shown to the applicants in SD Apply. To the form, you can also add fields for the applicant to fill, e.g. ask them to confirm the journal number or other identification information by submitting it via the form.
- License specifies the terms of use for the data, which the applicants need to approve when they fill in the access application form. In the license, you can for example refer to the terms specified in the data permit.
- With a workflow, you define who will manage the access applications of the organization in SD services. These named users will always receive a notification via email about new access applications and can approve or reject the applications in SD Apply.
The forms and licenses are public in SD Apply, so these should not include any sensitive information. These three objects will be used for all secondary use datasets coming from your organization, so they should also be as general as possible. Resource and Catalogue item will be created for each dataset automatically when the data is transferred via SFTP.
Step 3: Establishing a secure SSH connection with CSC
To prepare for the data transfer, we first need to establish a secure ssh connection between your laptop with CSC. Please follow these steps:
- Create an SSH key pair in RSA format via command line. See detailed instructions Do not use a password for your SSH key, leave this field empty.
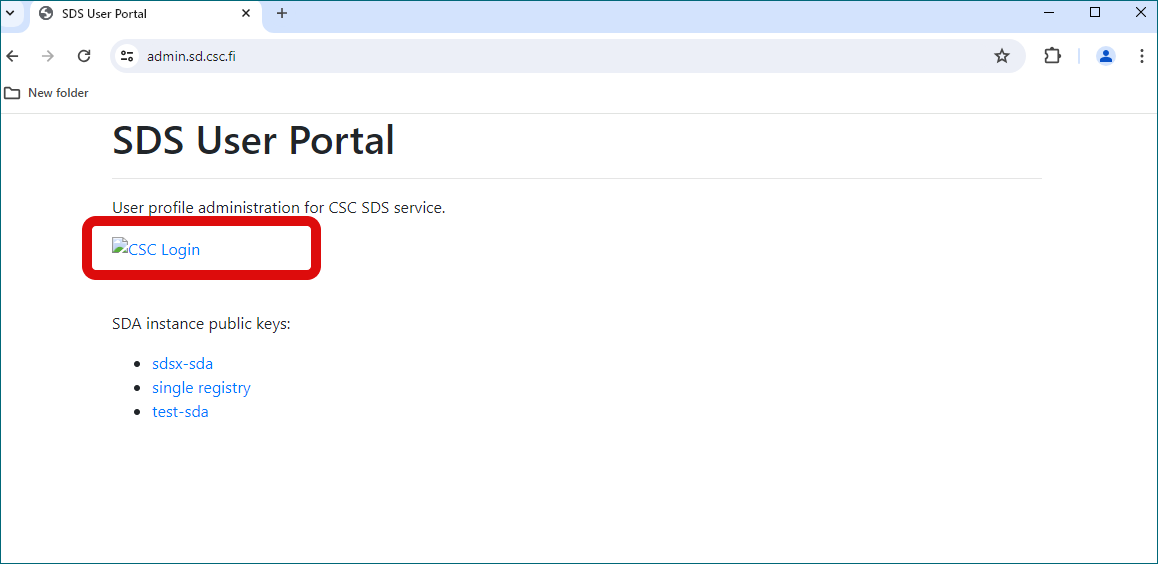
- Log in to the Sensitive Data user administration portal. If you don't have HAKA or Virtu accounts, please write to our helpdesk to ask for a CSC account. Setting up an account takes few days.
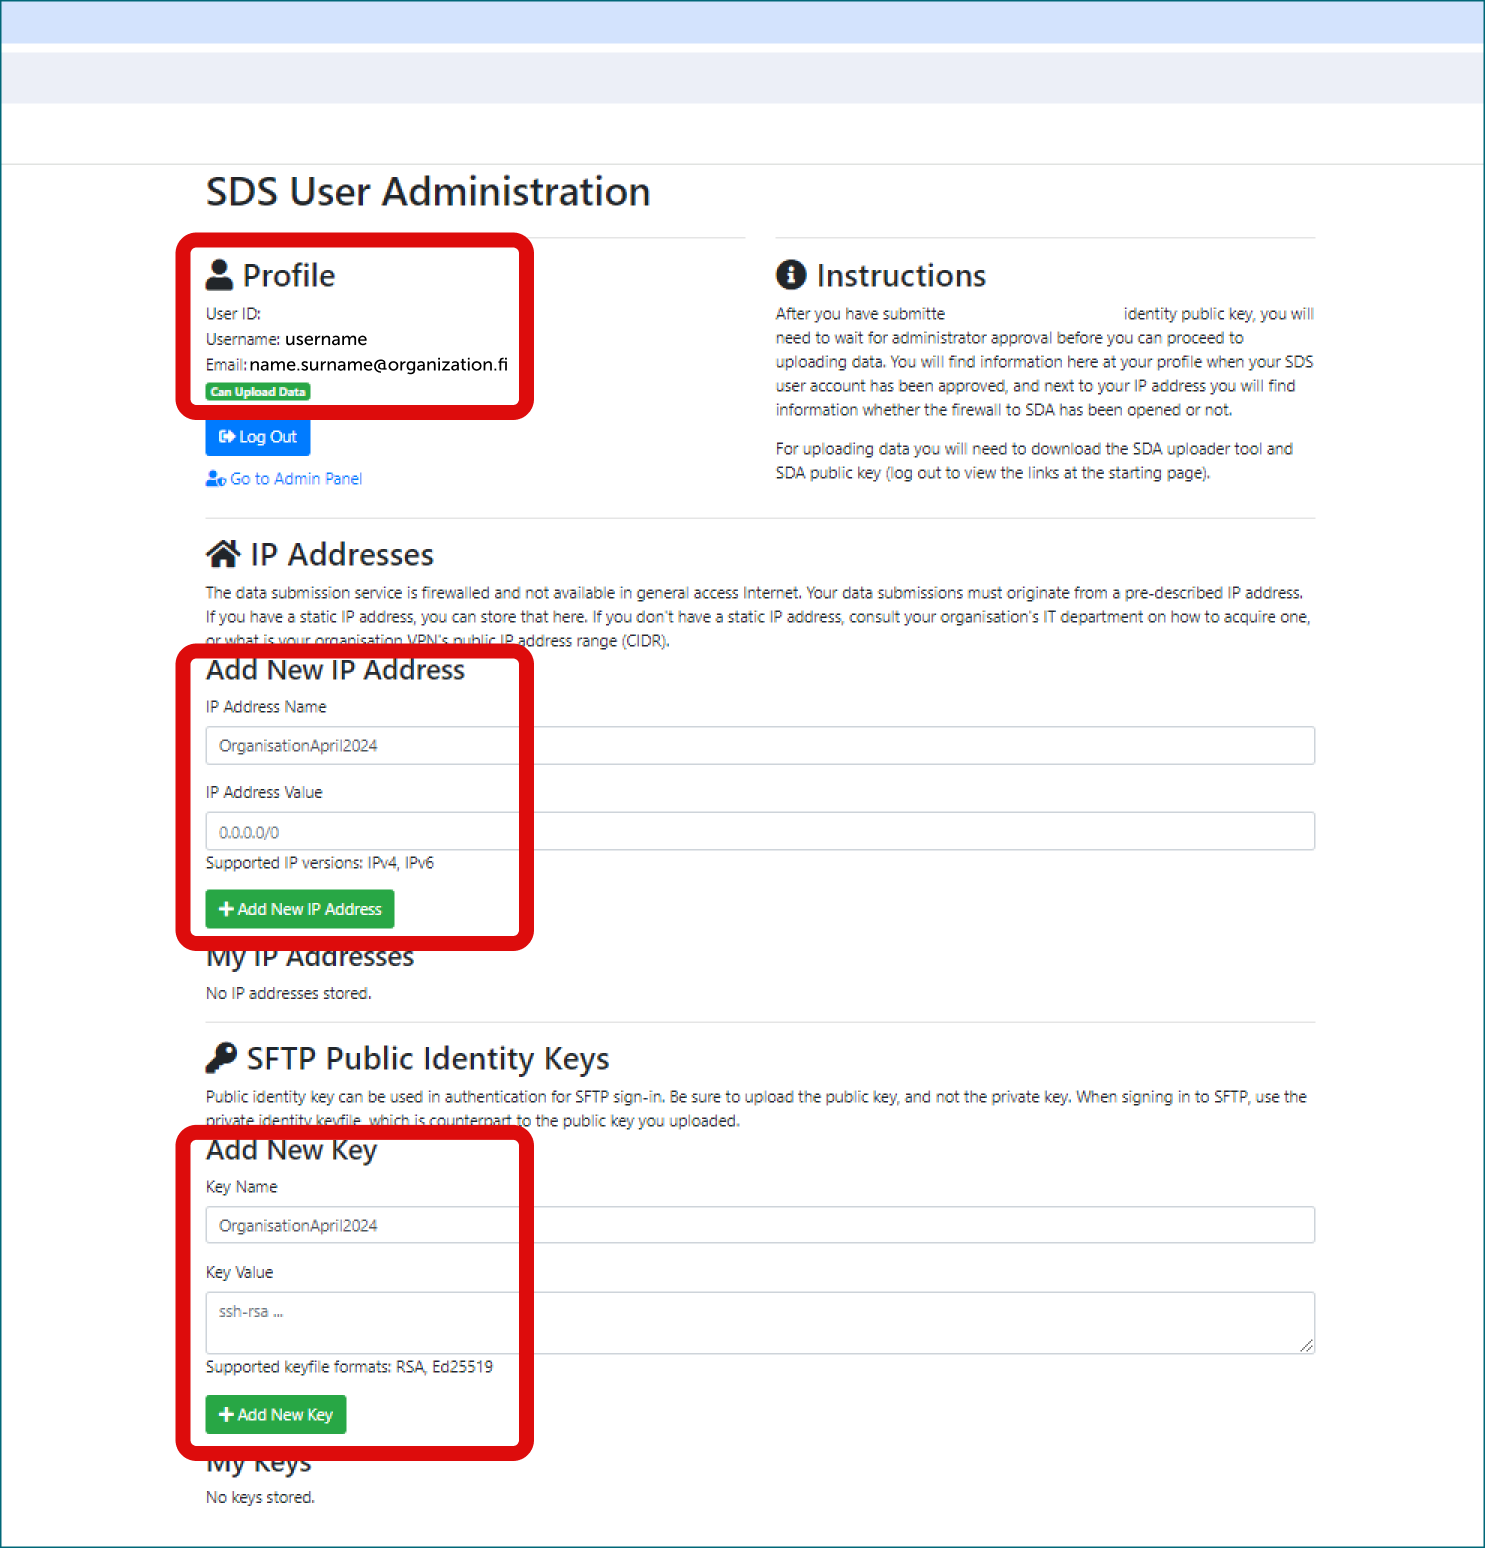
- In the administration portal, you add your public SSH key and a defined name (example: your organization and date) for it.
-
Add the IP address from which the data will be transferred and a defined name for it (e.g.: organization-date). IP address can be checked with CSC’s My IP app.
-
Next, please write to service desk (reply to same email thread) informing that these steps have been completed.
We will approve your account access to the secure connection and confirm it to you via email. Only at this point, you can test if is it is possible establishing a secure SSH connection with CSC by using this command and your SSH key:
sftp -i X:\folder\privateshhfilename.key -P 50527 username@org.fi@porin.lega.csc.fi
exit
Where:
-X:\folder\privateshhfilename.key is the path to the correspondent private shh key
username is the username visible in the user administration portal and org.fi is the same as in your email address.
Step 4: Encrypt and upload the files via the secure connection
You can now encrypt and transfer the dataset securely. While there are multiple methods available for this task, we recommend utilising the graphical user interface SDA (Sensitive Data Archive) Uploader tool. Installing this simple application may require special permission from your system administration, but it will conveniently enable the tool to establish the secure connection using the SSH keys you've already tested, encrypt the files with CSC public encryption key for registers, and upload them.
4.1 Upload with the SDA Uploader tool
With the SDA Uploader tool, you need to collect all the data to one folder on your computer before transfer.
Note
The folder name determines the indentifying information visible in SD Apply. Therefore, it is a good practice to use the journal number or other unique identifier for the folder name. This ensures that the correct data are always sent to the correct applicant, even in additional data transfers.
- Create a folder on your computer and name it with the journal number or other suitable unique identifier. Add all the files belonging to the dataset to that folder.
-
Download the SDA (Sensitive Data Archive) Uploader tool available on GitHub, for Linux, Mac and or Windows. You might need permissions from your administrators to install the SDA Uploader tool on your laptop.
- Windows (sdagui-python3.11-windows-amd64.zip )
- Mac (sdagui-python3.11-macos-amd64.zip)
- Linux (sdagui-python3.11-linux-amd64.zip)
-
Download the CSC public encryption key for registers.
-
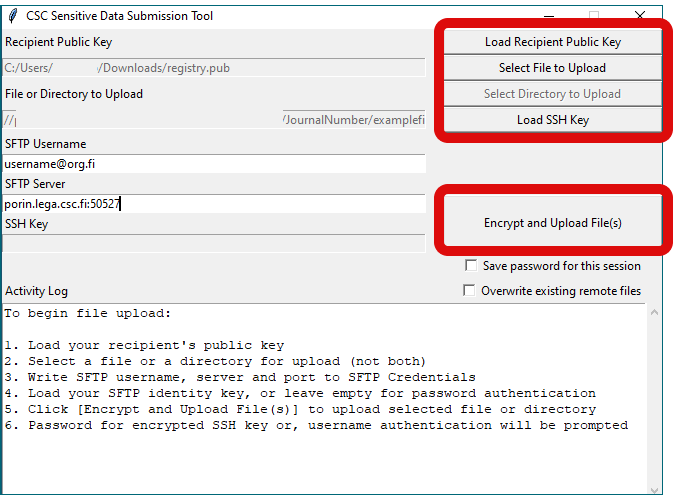
Open the SDA Uploader GUI tool and complete these steps:
- Add CSC public key for registers using
Load Recipient Public Keybutton. - Select the folder you want to upload with the
Select Directory to Uploadbutton. - Add your private SSH key (RSA format) with the
Load SSH Key. - Fill in your username (username@org.fi) to the
SFTP Usernametext field. - Fill in the SFTP server: porin.lega.csc.fi:50527 to the
SFTP Servertext field.
- Add CSC public key for registers using
-
Finally, click on upload and encrypt. All the files will be encrypted, uploaded to CSC and assigned to the same identifier in SD Apply. If the tool requests a password for your SSH key, just leave the field empty. The data will become automatically discoverable in SD Apply with the folder name.
4.2 Advanced options
This SDA (Sensitive Data Archive) Uploader tool is available on GitHub, via command line (CLI, option 2 below) options for Linux, Mac and Windows. More information about the tool in the GitHub repository. Alternatively, you can encrypt the data with Crypt4GH (also GUI available, option 3 below) and send the data directly with SFTP on command line. With each option, you need to use CSC public key for encryption.
Advanced option 1
With the SDA CLI tool, you also first create a folder on your computer and name it with the journal number or other unique identifier. Add all of the files belonging to the dataset to that folder. Then you add the following command to the command line (replace example_dataset_123 with the directory name, username@org.fi with your credentials, and X:\folder\filename.key (or ~/.ssh/filename for Linux/macOS) with the location of your SSH key):
sdacli example_dataset_123 -host porin.lega.csc.fi -p 50527 -u username@org.fi -i X:\folder\filename.key -pub registry.pub
Advanced option 2
With Crypt4GH and SFTP, you first encrypt the data with CSC public key with either Crypt4GH python module or GUI version. Then you open the SFTP connection with the following command (replace username@org.fi with your credentials and X:\folder\filename.key (or ~/.ssh/filename for Linux/macOS) with the location of your private SSH key):
sftp -i X:\folder\filename.key -P 50527 username@org.fi@porin.lega.csc.fi
Then create a directory for the dataset you are going to transfer:
mkdir example_dataset_123
cd example_dataset_123
Then you put all of the files belonging to that dataset to the folder:
put example_dataset_123_file-1
put example_dataset_123_file-2
put example_dataset_123_file-3
exit
After a successful upload, the dataset is visible in SD Apply. With the direct SFTP transfer, you can wait a moment after putting the first file to the folder for the directory to become visible in SD Apply, so the system doesn't create multiple entries for single directory. This might happen, if the files are sent too quickly one after the other. The files are not visible in the SFTP directory after transfer, as they are immediately ingested.
Note
You can always transfer more data for the same project/data permit by using the same directory. The data will become visible for the user in SD Desktop when they log in again. If you send multiple files with the same file name, the files are not replaced, but instead, both versions are kept and will be available for the user. If you need to delete files after transfer, for example when the data permit expires, please contact CSC Service Desk. Access to the data can be restricted after the expiration or in any point of the project, if needed (see below), but deletion of the data from CSC needs to be done manually by our administrators.
Data access management
After the data has been submitted, it is discoverable in SD Apply with the dataset ID (organization's identifier + the journal number).
The researcher who has received the data permit can contact the CSC service desk and ask for a CSC project with the data permit. After the project has been established, they can log in to SD Apply and apply for data access.
The assigned representatives of the data controller will receive a notification of the application via email. They can review and approve the application and set an end date for the data access in SD Apply. The access right can also be cancelled manually in the future, but automated end date is preferred to avoid unauthorised access after the data permit has expired.
Step 1: Confirm availability
When a new dataset you are associated with is uploaded to CSC, you will receive an automated email via SD Apply asking you to confirm your availability to act as a data access controller. Follow the link in your email or log in directly to SD Apply at https://sd-apply.csc.fi/ and confirm your availability.
Step 2: Login
As a data access controller, you receive email notifications each time when an applicant applies for data access to the dataset you are associated with.
To start processing applications, follow the link in your email or log in directly to SD Apply. Login to SD Apply is possible either with user identity federation systems (Haka or Virtu login) or with CSC account.
Note
Always use the same identity provider when you log in to SD Apply because all your actions are connected to your login identity.
Step 3: Process the application
In SD Apply, navigate to the "Actions" tab to see all the applications that are waiting for approval. Select View to open the application you want to process. You do not have to follow any specific order when you process the applications. The approval process is fully dynamic.
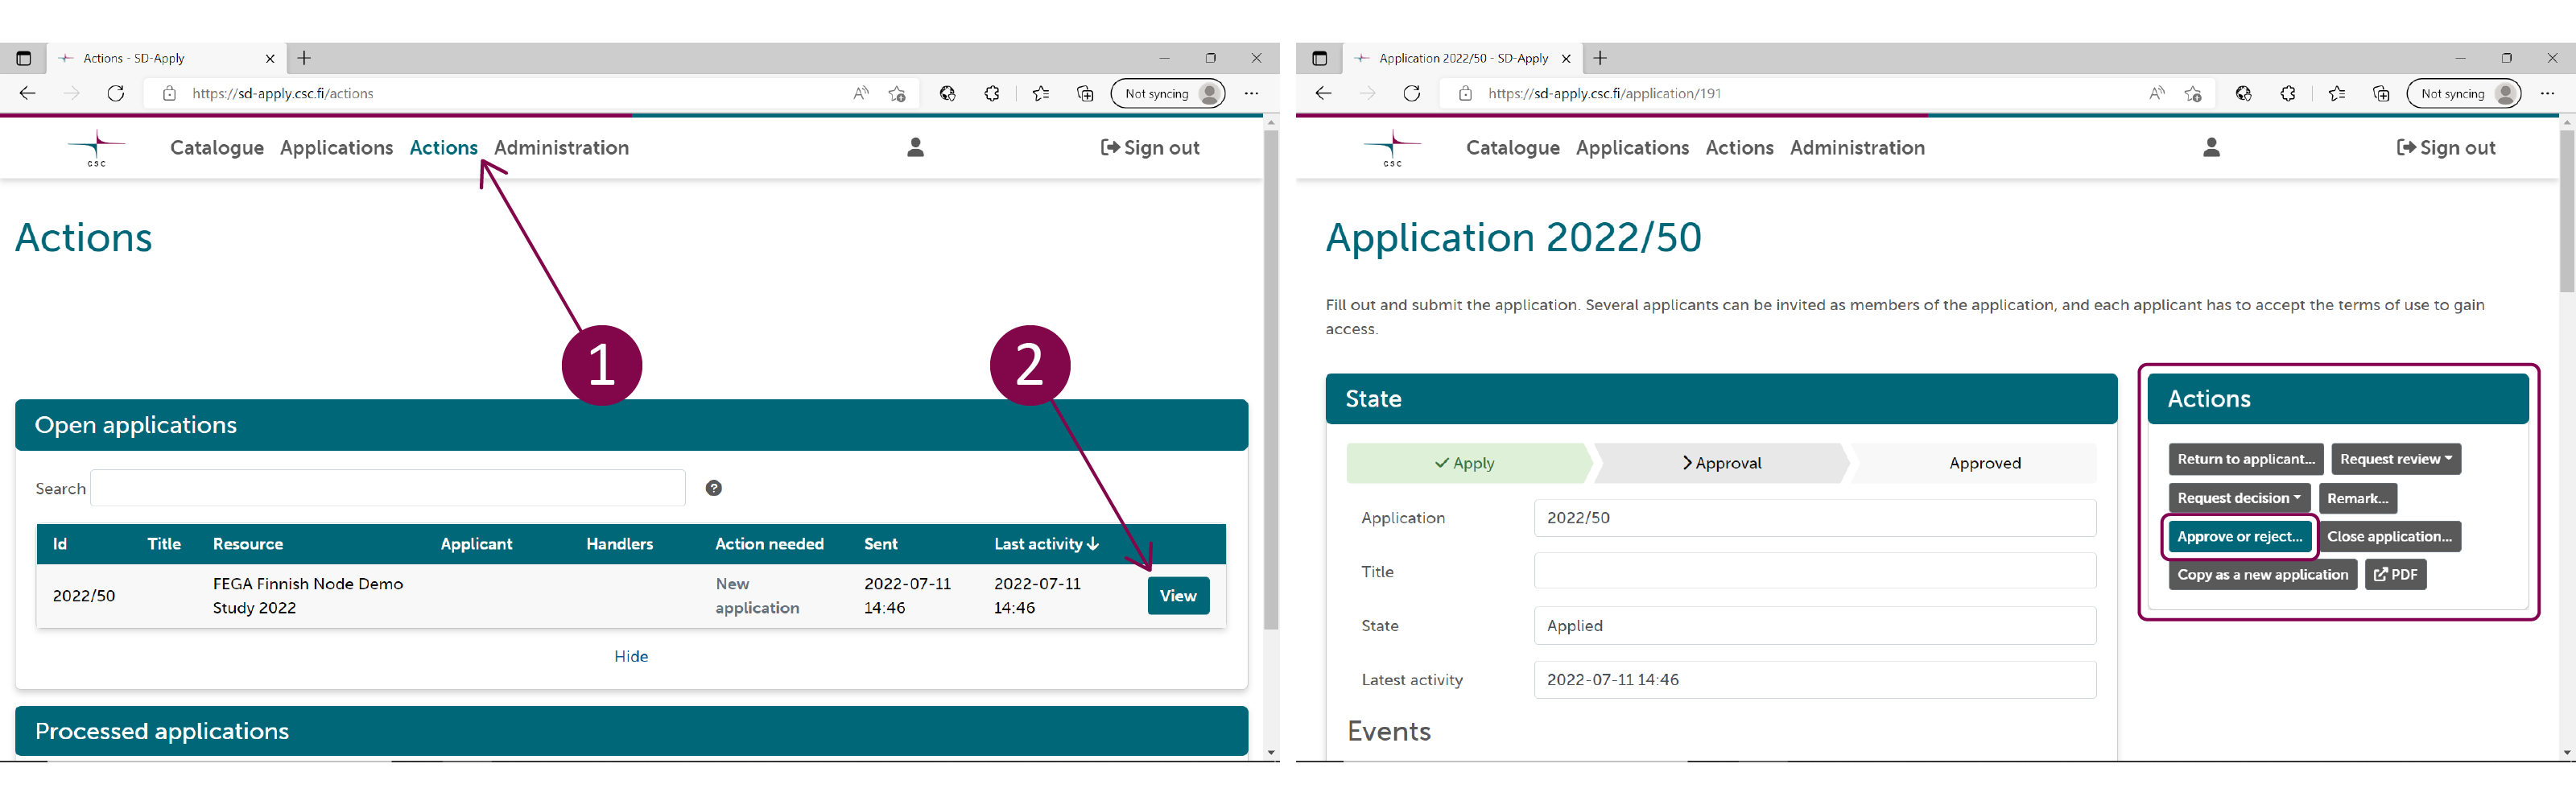
Approve or reject the application
You can approve or reject the application right away if the applicant has provided all the needed information. Select Approve or reject application under "Actions". If you reject an application, we recommend telling the applicant why the application was rejected by writing a comment.
When approving the application, you can also set an end date for the access right, e.g. the expiration date of the data permit. If no end date is set, the access right needs to be cancelled manually when the data permit expires by closing the application (see Step 4).
The applicant will receive an email notification about the decision. Once you approve or reject the application, the decision is final. You cannot edit it later. If the applicant has added members to their application, the members will get access rights too when the application is approved, if they have accepted the terms of use. Any member not having accepted the terms of use by that time will get access rights after they log in to SD Apply and accept the terms of use.
Note
If the owner of the dataset has removed the dataset that applicant is applying for access, SD Apply will give a warning, but you can still process the application. However, if the dataset has been removed, you cannot approve or reject the application.
Close the application
You can close the application at any stage of the process by selecting Close application. Closing means that the application process is cancelled and that the application cannot be modified or opened again. Write a comment on the comment field to explain why did you close the application.
We recommend closing the application, if it is somehow inappropriate. Deleting applications is not possible because we want to always provide a full history of the application process. You can find closed applications in the "Actions" tab under "Processed applications".
Step 4: After processing the application
You are able to manage the access rights of the applicant even after you have processed the application. You can find the processed applications from the "Actions" tab under "Processed applications". "Processed applications" view shows all the applications that have been approved, rejected, closed, or returned to the applicant. Select View to open a specific application.
Close the application
Closing the application cancels the access rights of the applicant and other application members. When the applicant and the application members do not need the access rights anymore, for example because the data permit has expired, you can cancel their access rights by selecting Close application.
Revoke access rights
If the applicant has been granted access rights but they misuse them, you can revoke their rights by selecting Revoke entitlement. Revoking will add the applicant and all the application members to a blacklist. This means that if any of them tries to apply for access rights to the same dataset again, SD Apply will warn the application handlers. The owner of the dataset can edit the blacklist. You can find the blacklist from the "Administration" tab.
Email notifications
You will receive email notifications about the actions of other SD Apply users. There might be more than one data access controller in one organization. Therefore, all the controllers who have been assigned to a certain dataset, receive an email notification when one of them has processed an application.
You can see and edit your email address from the "Settings" tab in the top right corner of the page.
You will also receive notifications when an applicant has submitted or resubmitted an application.