Backup server for SD Desktop
For security reasons only the Project Manager can export data from SD Desktop. Thus normal SD desktop users can not make backup copiens of the data that they have in SD Desktop. This tutorial demonstrates the usage of backup_server.sh process and sd-backup commands that provide a way for SD Users to backup their data to SD Connect.
Installation
The tools for running backup process are not by default installed in SD Desktop Virtual Machines. Thus the first step is that the Projet manager installs the SD Backup tool package using the SD-tools-installer.
Log in to your SD Desktop and open Data Gateway. If the software installation help tools are enabled for your project, then you should have folder: tools-for-sd-desktop included in the directory that Data Gateway created ( in Projects/SD-Connect/your-project-name). If you don't find tools-for-sd-desktop directory through data gateway send a request to servicedesk@csc.fi. In the request, indicate that you wish that the SD Desktop software installation help tools would be made available for your project. You must also include to the message the Project identifier string of your project. You can check this random string for example in the SD Connect service. There you find the Project Identifier in the User information view.
Open tools-for-sd-desktop folder and from there, drag/copy file sd-installer.desktop to your desktop.
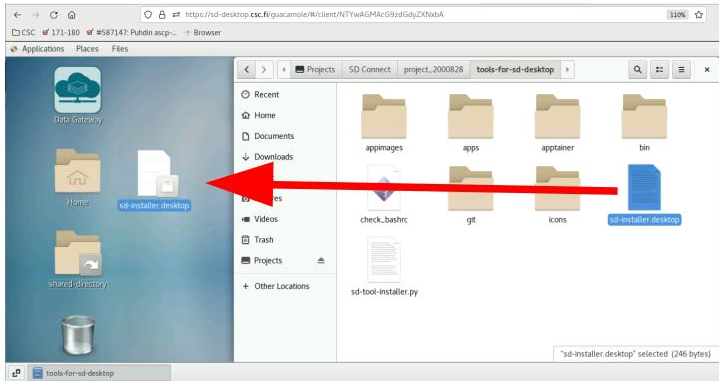
Figure 1. Copying sd-installer.desktop file to SD desktop.
Double click the copy of sd-installer.desktop to start the software installation tool. Use this tool to install SD Backup tool to your SD Desktop virtual machine if you have not yet done so.
Project Mangers Starts backup server
When the SD Backup tool is installed, the Project Manager should start new terminal session, and there start a virtual terminal session with command:
screen
sd-backup-server.sh
After that the project manager can leave the virtual session running in background by pressing: Ctrl+a+d.
This way the sd-backup-server.sh command remains active in the virtual terminal session even when the connection to SD Desktop is closed.
The actual server process is very simple. It checks the content of the backup directory once in a minute and moves the contents of this directory to a bucket in SD Connect. The data is encrypted with CSC public key only so that the backups can be used only in SD Desktop environment. The default backup directory is /shared-data/auto-backup and taget bucket in SD Connect is sdd-backup-vitual-machine-name.
Note that the server is not able to check if the given password was correct. If a wrong password was given then backup requests will fail. Thus it may be good to test the backup process once the server is running.
Doing backups
When the backup server is running, all users of the VM can use command sd-backup to make a backup copy of the dataset to SD Connect. The syntax of the sd-backup command is:
sd-backup file.csv
sd-backup directory
For example, for a file called my_data.csv that locates in SD Desktop virtual machine called secserver-1683868755, a backup command:
sd-backup my_data.csv
Projects/SD-Connect/project_number/sdd-backup-secserver-1683868755/my_data.csv-2023-05-15-07:41
Note that you have to refresh the Data Gateway connection in order to see the changes in SD Connect.